


Ensembl Virtual Machine
Ensembl has available for download a virtual machine pre-packaged and pre-configured the latest ensembl-api. It is a quick and simple way to get started with Ensembl.
Overview of the process
The process is described in detail in the remainder of this document, with the main steps summarised as follows.
- Obtain VirtualBox
- Download and import the virtual machine
- Create shared folders
- Start and verify the Ensembl installation
- (Optional) Resize virtual disk
1. Obtaining VirtualBox
Virtualbox is a free and opensource virtualisation platform used to run the Ensembl Virtual Machine; it is necessary to download and install this package to run the VM (Virtual Machine). You can obtain it by visiting the VirtualBox downloads page https://www.virtualbox.org/wiki/Downloads and downloading and installing the appropriate standard virtual box platform package for your platform.
2. Download and import the Ensembl Virtual Machine
The Ensembl Virtual Machine can be downloaded from https://ftp.ensembl.org/pub/current_virtual_machine
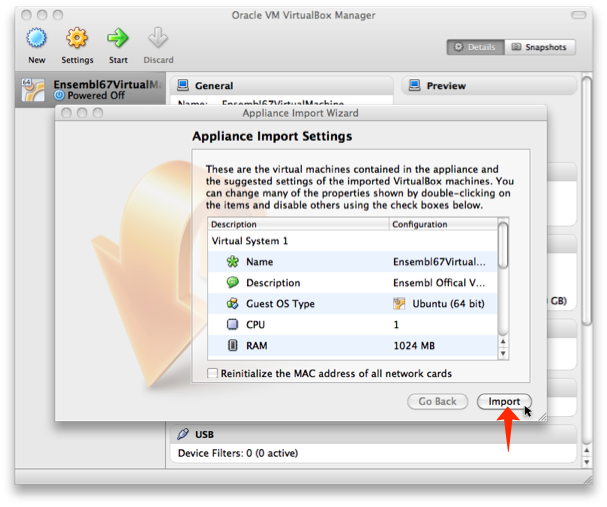
Once the download is complete, double click on the file which will cause VirtualBox to launch with the dialog box below; click "import" as indicated by the red arrow in the image.
This will prompt the appearance of the following dialog

Once the process has completed you should see the following window, indicating that the import was successful and the VM is in a stopped state.

Do not start the VM at this point. The next step is to configure VirtualBox to allow read/write access to folders on your host machine.
3. Configuring Shared Folders
To allow read/write access from the VM to your laptop/desktop filesystems you must configure shared folders. Configuring of shared folders must be performed whilst the VM is in a stopped state. It is a simple process and is illustrated in the image below

- Bring up the shared folders dialog by clicking the "Shared Folders" option in the VirtualBox control panel indicated by the "1" in the image
- Click the add folder icon illustrated by "2" in the image above
- Toggle the "Auto-mount" option to on (shown by "3" in the image above)
- Click the drop down at position "4",
- Click "Other..." which will bring up the file browser for your platform. Navigate to a folder you wish to share and choose it.
- Your shared directory will be mounted under /media/ when you next start up the virtual machine.
You should now have a view similar to the last panel, indicating success. Click OK to dispense with the window.
4. Starting the Virtual Machine and Verifying the installation
It is trivial to start the Virtual Machine. Simply click the start button indicated by the red arrow on the control panel in the image below.

The VM will now begin to boot and you will be presented with the following display

Once completed, the Ensembl Desktop will appear with shortcuts to the ensembl-api-folder, VEP and your Shared Folders on the desktop

Verify installation
Now verify the installation, click on the terminal icon on the panel on the left, and run the following command
ensembl@ensembl:~$ ./verify_installation
You should receive the following output to indicate success.
ensembl@ensembl:~$ ./verify_installation

Installation is good. Connection to Ensembl works and you can query the human core database
Verify the Variant Effect Predictor (VEP)
cd ~/VEP
./vep --database -i examples/homo_sapiens_GRCh38.vcf
This produces a pair of results files: variant_effect_output.txt and variant_effect_output.txt_summary.html
Running ./vep by itself will show you all the available command line options, such as changing the location of the of the output files.
5. (Optional) Resize virtual disk
This section applies only in case you want to increase the size of the Ensembl VM disk, e.g. to store and use some VEP cache files which wouldn't fit on the currently available disk space.
The Internet is full of very good advices on how to do that; a good tutorial can be found here.
If you're host machine runs Linux, you can follow the instructions below:
1. Find and go to the location of the virtual disk
# e.g., in an Ubuntu system, the latest imported appliance (Ensembl 75, at the time of writing) is here:

$ cd ~/VirtualBox VMs/EnsemblVirtualMachine75
$ ls
Ensembl75VirtualMachine-disk1.vmdk Ensembl75VirtualMachine.vbox Ensembl75VirtualMachine.vbox-prev Logs/

# the disk is Ensembl75VirtualMachine-disk1.vmdk
2. Clone the disk into one with VDI format
$ VBoxManage clonehd Ensembl75VirtualMachine-disk1.vmdk Ensembl75VirtualMachine-disk1.vdi --format vdi
3. Resize the clone
# Here we are increasing the size to 20GB
$ VBoxManage modifyhd Ensembl75VirtualMachine-disk1.vdi --resize 20480
4. Clone the updated VDI disk into one with VMDK format
# Do not overwrite the original VMDK, clone the VDI disk into a different one (Ensembl75VirtualMachine-disk1-temp.vmdk in the following example).
$ VBoxManage clonehd Ensembl75VirtualMachine-disk1.vdi Ensembl75VirtualMachine-disk1-temp.vmdk --format vmdk
5. Remove old/Add new disk
Launch the VirtualBox manager, select the VM and then "Settings"
- go to "Storage"
- select the current disk under "Controller: SATA controller", right click then "Remove attachments"
- select the icon "Add hard disk" in "Controller: SATA controller", then "Add existing disk"
- select the new VMDK disk
6. Resize the partition with GParted
- download GParted 64 bit ISO image somewhere on your host machine
- Launch the VM with VirtualBox
- Select "Devices" --> "CD/DVD devices" --> "Choose a virtual CD/DVD disk file"
- Select GParted ISO image from its location on the host computer
- Reboot the VM
- press F12 at boot time
- run GParted live disk
- delete extended partition with swap (old and new unallocated space must be adjacent)
- select primary partition and then "Resize/Move"
- resize the partition up to the intended space (be sure to leave 512MB for swap)
- create an extended partition of 512MB
- create the SWAP space in the extended partition
- exit GParted
- shutdown/reboot the VM